How to Convert Hyper-V VHD Disks to VHDX

Windows Server 2012 Hyper-V offers a new virtual disk type called VHDX. VHDX virtual disks have many benefits, including larger maximum disks up to 64TB, protection against data corruption, and improved alignment of the virtual hard disk format to work well on large sector disks. Seehttp://technet.microsoft.com/en-us/library/hh831446.aspx for more information about the VHDX disk type.


You can convert existing older format VHD disks to the new VHDX format using the Hyper-V Manager console. This process will create a new VHDX disk and copy the data from the existing VHD to the new disk. At the end of the procedure you will have two disks, the original VHD disk and a new VHDX disk with the same contents. You can safely delete the original VHD disk once you have confirmed that the new VHDX disk is fully functional.


Here are the steps to convert an existing VHD disk to a VHDX disk:

  • Shut down the VM that is accessing the disk, if necessary. You cannot convert a disk that is in use.
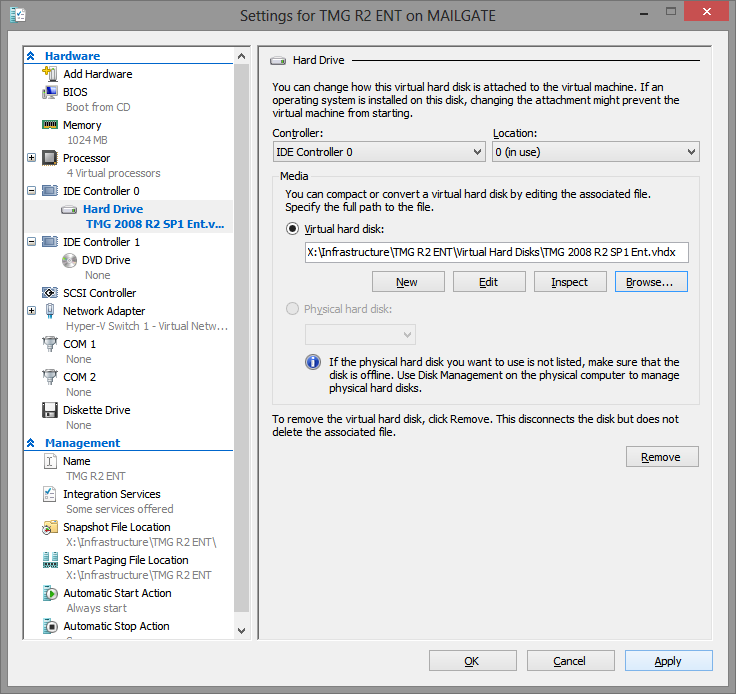
  • Open the Hyper-V VM settings, navigate to the hard drive you wish to convert, and click the Edit button, as shown below:
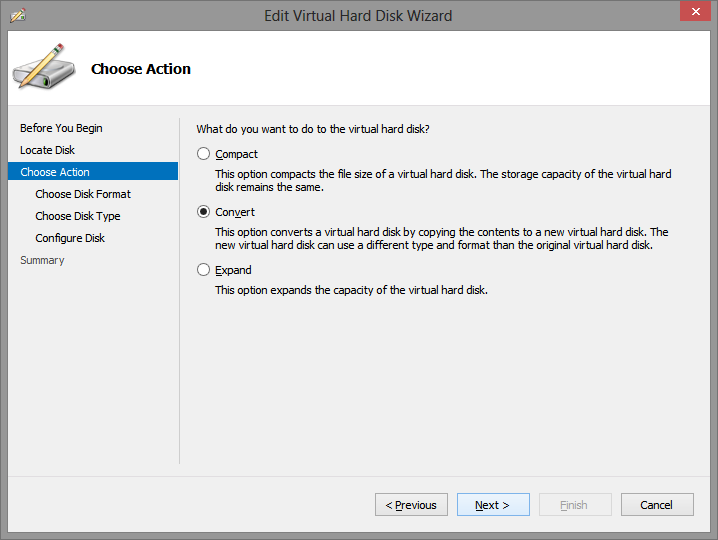
  • The Edit Virtual Hard Disk Wizard will start. Select Convert from the Choose Action page and click Next.
  • Select the VHDX disk format and click Next.
  • Choose whether the new disk should be fixed size or dynamicallyexpanding. Note that this gives you the opportunity to change disk types from the previous disk type. Click Next.
  • Select the name and location for the new VHDX disk and click Next.
  • Review the summary and click Finish to create the new disk. This may take a few minutes depending on the size of the VHD and the speed of your hard drive(s). The size of the new VHDX disk will be slightly larger than the original VHD disk.


  • The last step is to mount the new VHDX disk to the Hyper-V VM. Note the new VHDX extension.

Once you have started up your VM with the new VHDX disk you can safely delete the old VHD disk.


PowerShell Script to Identify Computer Accounts That Have Not Been Used For A While


Working for an IT Company, providing a support service we have to keep on top of day to day admin tasks, one of these tasks is keeping Active Directory in order. This task can become more difficult as time goes by, as I am sure I am not the only one who does not keep AD up to date when removing PC’s and Servers from the domain… below is a handy little PowerShell script that I put together that will output any PC / Server that has not logged on for 60 days or more:

$ErrorActionPreference=”SilentlyContinue”
Stop-Transcript | out-null
$ErrorActionPreference = “Continue”
Start-Transcript -path C:\output.txt -append
$maxOldLogonDays = 60
$adsiSearcher = new-object DirectoryServices.DirectorySearcher(“LDAP://rootdse”)
$adsiSearcher.filter = “objectCategory=Computer”
$adsiSearcher.findall() |
Foreach-Object `
{
“Processing $($_.path)”
$rawLogon = $_.properties.item(“lastlogon”)
$convertedLogOn = [datetime]::FromFileTime([int64]::Parse($rawLogon))
If( ((get-date) – $convertedLogOn).days  -ge $maxOldLogonDays )
  {
    “$($_.properties.item(‘distinguishedName’))
     has not logged on for more than  $maxOldLogonDays days”
  } #end if
} #end foreach
Stop-Transcript

All you need to do is copy and paste the above text to a notepad file and save it as a .PS1 (powershell commandlet format)

VMware Changing the thick or thin provisioning of a virtual disk

This article provides steps to change the provisioning of a virtual disk from thick to thin, or from thin to thick. The procedure uses the vSphere Client and vCenter Server to perform this task

To change the provisioning of a virtual machine base disk from thin to thick from the Datastore Browser:

  1. Power off the virtual machine.
  2. In the vSphere Client, select the virtual machine in the inventory.
  3. Click Edit Settings to display the Virtual Machine Properties dialog box.
  4. Click the Hardware tab and select the appropriate hard disk in the Hardware list. The Disk Provisioning section on the right shows the type of your virtual disk, either Thin or Thick.
  5. Click the Summary tab.
  6. Under Resources, double-click the datastore where the virtual machine resides to open the Datastore Browser dialog box.
  7. Click the virtual machine folder to find the virtual disk file you want to convert. The file has the .vmdk extension.
  8. Right-click the VMDK file, and click Inflate. The Inflate option converts the disk to thick provisioned.

Notes:

  • If the Inflate option is grayed out, this may indicate that the virtual machine is not powered off or that it is not thin provisioned.
  • There should be no snapshots and the conversion is performed on the base disk.

To convert a virtual machine base disk from thick to thin provisioning by changing the datastore and using offline virtual machine migration:

  1. Power off the virtual machine.
  2. Right-click the virtual machine, and click Migrate.
  3. Click Change datastore.
  4. Click Next, and select a datastore that is not the same as the current datastore.
  5. From the dropdown, select the Thin Provision virtual disk format.
  6. Click Next, then Finish.

Microsoft Server 2008 R2 – Server Wont Boot – Recovery Console


One of our customers had a power cut, and the UPS did not save the day…. we could not get the server up and running again as all it wanted to do was to load the recovery console.

The only way to resolve the problem was to perform the following commands loading the command prompt from the recovery console.

Browse to E:\Windows\System32\config\RegBack copy the “System” and Paste to E:\Windows\System32\config

copy system.* to c:\windows\system32\config

*** Remember when you are in the recovery console the C drive is not the original C drive of the server it will be D or E drive depending on your disk layout ***

Installing VMWare ESXi 5.1.0 On Dell Hardware


While installing ESXi 5.1.0 (making use of VMware native Image), you might observe ‘No network adapters were detected’ error message.

The reason for this is because the VMware native ESXi 5.1.0 image does not contain the required version(s) of network drivers for Network Daughter Cards (NDC) or Network adapters used in Dell 12G Servers.

You need to make use of the Dell Customized ESXi 5.1.0 Image posted at support.dell.com, which contains the required network drivers for all NDC’s and Network adapters used in Dell 12G Servers.

NOTE: Follow the steps listed in Downloading Dell Customized ESXi image for downloading Dell Customized Installer Image

Upgrading VMWare ESXi 5.0.0 to ESXi 5.1.0

Upgrade using ISO Disk Image

  • Select ESXi5.1.0-799733-Standard Installer

  • Select the Storage device on which the installation has to be upgraded

  • Select Upgrade ESXi, Preserve VMFS datastore

  • Press F11 to proceed with the upgrade

  • Enter to reboot after the upgrade has been completed. Please make sure to remove the installation DVD/CD and BIOS has been altered to change the boot order adjust it accordingly

Ta Da!!! you are now running VMWare ESXi 5.1.0 on your host


VMWare 5.1.0 Important Considerations for Upgrading:

http://longwhiteclouds.com/2012/09/12/vsphere-5-1-generally-available-important-upgrade-considerations/

Running Hyper-V on Windows Server 2012 from VMware Workstation 8


So the scenario is that I have an instance of Windows Server 2012 running on VMware Workstation 8 on my laptop (Windows 8).

Adding Hyper V role to the server

Speed bump

The other error that has been recorded:

Fix:

Shutdown the Windows Server 2012

Browse to your VM location and open the vmx file and append at the end the following two lines

1 hypervisor.cpuid.v0 = “FALSE”

1 mce.enable = “TRUE”

Save and power up your VM

Let’s try that again

Now you should be able to go on and configure your Hyper- V role on the server.

Running Nested ESXi 5 in VMWare Workstation 8


VMware Workstation 8

The best thing about VMware, is I can also virtualize ESXi inside VMware Workstation!  So on my laptop, in VMware Workstation, I can run multiple ESXi servers, that in turn have VMs inside them.  Even better is the fact that I can have 64bit guests inside my ESXi servers running inside VMware Workstation.  Sounds confusing as I type, so here’s a diagram:

In order to run ESXi inside VMware workstation, we simply need to select “VMware ESXi 5″ as the operation system of the guest VM we are creating.

Then, Edit the VM’s Settings, and under the Hardware tab, and processors, check the box to Virtualize Intel VT.

The option to run ESXi inside of VMware workstation is great, especially for when you don’t have a lot of physical hardware to test with. I have also used it to test H/A scenarios. 

VMWare ESXi 5 High Availability Isolation Network Problems


Installing VMWARE ESXi 5 High Availability in a school today, I came across a problem with the ISOLATION network address being the gateway not being pingable from any of the VM Hosts as the local authority has prevented icmp packets (Ping) across the LAN. So to force the HA Cluster to use a different IP for the isolation network you will need to do the following:

Multiple isolation response addresses can be specified using the das.isolationaddress0 through das.isolationaddress9 options.

To specify the values for these options in Virtual Infrastructure Client:

  1. Select the HA cluster.
  2. On the Summary tab, click Edit Settings.
  3. In the Settings dialog, select VMware HA.
  4. Click Advanced Options.
  5. In the Advanced Options (HA) dialog, enter the option name and the corresponding value:
    • Option: das.isolationaddress0
    • Value: A valid IP address other than the default gateway address
      Similarly, you can set more isolation response addresses using das.isolationaddress1 throughdas.isolationaddress9.
  6. In the Advanced Options (HA) dialog box, set this option:
    • Option: das.usedefaultisolationaddress
    • Value: false
      Notes:
      • You must set this option if you are setting multiple isolation response addresses.
      • Additionally you should configure das.usedefaultisolationaddress to false when the default gateway is a device which cannot be pinged.
  7. Click OK.
  8. Click OK.
  9. Edit settings for the cluster again.
  10. Disable HA and click OK.
  11. Edit settings again.
  12. Enable HA and click OK.

At the time of VMware HA configuration, if none of the specified addresses can be reached, the configuration operation fails. If only a subset of the specified isolation addresses cannot be reached, then the configuration operation succeeds, but a configuration issue is displayed for the cluster and the cluster becomes yellow. The configuration issue identifies the isolation response addresses that could not be reached.

Although VMware HA supports a maximum of 10 isolation response addresses, in most cases one or two isolation response addresses should be sufficient. Also, the das.isolationaddress option formerly used to set a single isolation response address is still supported.

Note: If you specify multiple isolation response addresses, VMware recommends that you ensure the correct operation of VMware HA by:

  • Use the default gateway address and other reliable addresses physically close to the hosts in the cluster.
  • Ensure a corresponding isolation address is setup for each service console network that has been created on the ESX Server.
  • Change the default failure detection time to 20 seconds or greater. To change the default failure detection time:
    1. Select the HA cluster.
    2. On the Summary tab, click Edit Settings.
    3. In the Settings dialog, select VMware HA.
    4. Click Advanced Options.
    5. In the Advanced Options (HA) dialog, enter the option name and the corresponding value:
      • Option: das.failuredetectiontime
      • Value: A value in milliseconds that represents the timeout value (20 seconds = 20000 milliseconds)
    6. Click OK.
    7. Click OK.

Notes:

  • das.failuredetectiontime does not need to be increased when multiple das.isolationaddress options are specified as the pings occur in parallel.
  • das.failuredetectiontime is no longer supported in vCenter Server 5.0. For more information, see vSphere HA Advanced Attributes.