Office 365 Tenant to Tenant Migration without expensive tools

Office365.png

I have recently been working on a project to move nearly 2000 users from one Office 365 tenant to another. You may say simple, there are plenty of third party tools out there that will do that for you, but what about if the customer has not budgeted for the extra cost for these tools…. What do you do?

Now in this solution we had to purchase a very cost effective tool and a SSL certificate for the Exchange Server. The costs for these were no where near the costs of all of the well known tools from BitTitan and Cloud Migrator. we were quoted $6 per user by BitTitan as it was education or for normal businesses we were quote $14 per user. So as you would expect approx 2000 licenses at $6 each works out very expensive for an unexpected cost.

The tool we used was called Systools OneDrive Migrator and as you can see the tool cost starts from $99. We ended up paying $1 per user for this product. So a massive saving on the total cost of the tool from other competitors.

Stage 1 – Build a On Premise Hybrid Server

Download the latest Exchange 2016 ISO from here: Exchange Download

Before you deploy the On Premise Exchange Server you need to make sure your AD infrastructure is in good shape and able to support the deployment of Exchange 2016, so you need to ensure that the Forest and Domain Functional Levels are at least Windows Server 2008 R2

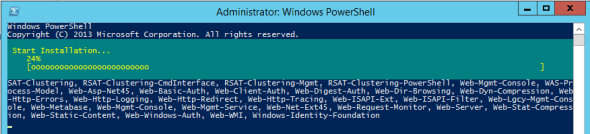
Before you begin to install Exchange Server 2016 you will need to install the Windows Server Roles and Features… Below is the PowerShell to ensure that all Windows Features are deployed:

Windows Server 2012 and 2012 R2

Install-WindowsFeature AS-HTTP-Activation, Desktop-Experience, 
NET-Framework-45-Features, RPC-over-HTTP-proxy, RSAT-Clustering, 
RSAT-Clustering-CmdInterface, RSAT-Clustering-Mgmt, 
RSAT-Clustering-PowerShell, Web-Mgmt-Console, WAS-Process-Model, 
Web-Asp-Net45, Web-Basic-Auth, Web-Client-Auth, Web-Digest-Auth, 
Web-Dir-Browsing, Web-Dyn-Compression, Web-Http-Errors, Web-Http-Logging, 
Web-Http-Redirect, Web-Http-Tracing, Web-ISAPI-Ext, Web-ISAPI-Filter, 
Web-Lgcy-Mgmt-Console, Web-Metabase, Web-Mgmt-Console, Web-Mgmt-Service, 
Web-Net-Ext45, Web-Request-Monitor, Web-Server, Web-Stat-Compression, 
Web-Static-Content, Web-Windows-Auth, Web-WMI, Windows-Identity-Foundation,
RSAT-ADDS

Windows Server 2016

Install-WindowsFeature NET-Framework-45-Features, RPC-over-HTTP-proxy,
RSAT-Clustering, RSAT-Clustering-CmdInterface, RSAT-Clustering-Mgmt, 
RSAT-Clustering-PowerShell, Web-Mgmt-Console, WAS-Process-Model, 
Web-Asp-Net45, Web-Basic-Auth, Web-Client-Auth, Web-Digest-Auth, 
Web-Dir-Browsing, Web-Dyn-Compression, Web-Http-Errors, Web-Http-Logging, 
Web-Http-Redirect, Web-Http-Tracing, Web-ISAPI-Ext, Web-ISAPI-Filter, 
Web-Lgcy-Mgmt-Console, Web-Metabase, Web-Mgmt-Console, Web-Mgmt-Service, 
Web-Net-Ext45, Web-Request-Monitor, Web-Server, Web-Stat-Compression, 
Web-Static-Content, Web-Windows-Auth, Web-WMI, Windows-Identity-Foundation,
RSAT-ADDS

When the pre reqs are installing it will look something like this:

exchange-2016-pre-requisites-01

You then need to prepare the your AD Environment by running the following commands:

setup o	/prepareschema
      o	/prepareAD
      o	/preparealldomains
			    /iacceptexchangeserverlicenseterms

and then to begin the installation of Exchange 2016 you need to run the following:

setup /m:install /r:mailbox /iacceptexchangeserverlicenseterms

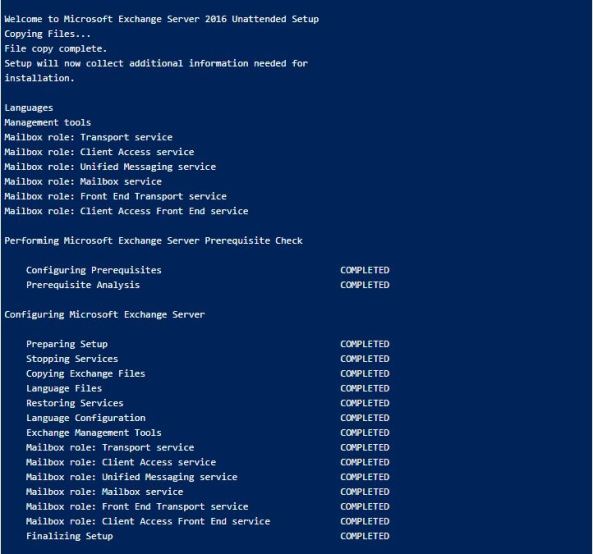
A successful Exchange Installation will look like this:

Exchange 2016 Installation

Stage 2 – AAD Connect

A Guide for deploying AAD Connect can be found here

Key things to take into consideration are to ensure the following:

1, The AD Account UPNs match that of the email address of the user

2, When you deploy AAD Connect the following options must be chosen in order for the Exchange Hybrid to work correctly:

optional_features

Stage 3 – Update all the users in Active Directory to have some Exchange attributes

The first thing you need to do is collect information about the online mailbox that you are looking to move. The information you need is the Mailbox Alias The User Principal Name and the Mailbox Guid. To get this information and output it to a CSV file run the following script in your Exchange Online Shell.

Get-Mailbox -ResultSize Unlimited | 
Select-Object Alias,UserPrincipalName,ExchangeGUID | 
Export-Csv -Path c:\temp\userExport.csv -NoTypeInformation

Once you have exported the above information you will need to move over to you On Premise Exchange Server and the Exchange Management Shell and run the following command that update all of the Active Directory objects with the required Exchange Attributes:

$allUsers = Import-Csv C:\temp\userExport.csv
foreach ($user in $allUsers) { Enable-RemoteMailbox $user.alias 
-RemoteRoutingAddress "$($user.alias)@tenant.mail.onmicrosoft.com"; 
Set-RemoteMailbox $user.alias -ExchangeGuid $user.ExchangeGuid 
-EmailAddressPolicyEnabled $false -PrimarySmtpAddress 
"$($user.alias)@bscmail.org" }

When you go into the Exchange Management Centre and look at the mailboxes you will be able to see all of your Exchange Online Mailboxes listed in your On Prem Exchange Server.

Stage 4 – Migrate mailboxes to Exchange 2016

Prepare the Hybrid Configuration

Details for configuring and Exchange Hybrid based on your on prem Exchange Server can be found here:

https://technet.microsoft.com/en-us/exdeploy2013/Checklist?state=3229-W-AQAIAAAAQAAAAAEAAAAAAAAAAAAAwAMAAAA~

Migrate Mailboxes to the Hybrid Server

Steps to migrate mailboxes from Exchange Online can be found here:

https://docs.microsoft.com/en-us/exchange/hybrid-deployment/move-mailboxes#move-exchange-online-mailboxes-to-the-on-premises-organization


Stage 5 – Migrate mailboxes to the other Office 365 Tenant

Re point the Hybrid connection to the new Office 365 Tenant

All the hard work would have been done in the previous section about creating the hybrid. – all you need to do here is re run the hybrid configuration wizard and point it at the new Office 365 tenant.

Migrate mailboxes to Office 365

Steps to move mailboxes back to Office 365 can be found here

https://docs.microsoft.com/en-us/exchange/hybrid-deployment/move-mailboxes

Stage 6 – Preparing OneDrive For Business for Migration

In order for us to be able to migrate data from OneDrive for business we will need to configure user interpretation on all of the users OneDrive sites. To do this the following steps need to be followed:

Assign eDiscovery permissions to OneDrive for Business Sites – Follow this guide from Microsoft:

https://docs.microsoft.com/en-us/office365/securitycompliance/assign-permissions-to-onedrive-for-business-sites?redirectSourcePath=%252fen-us%252farticle%252fAssign-eDiscovery-permissions-to-OneDrive-for-Business-sites-422858ff-917b-46d4-9e5b-3397f60eee4d

Once this has been done, the user that will be used to the data migration will have sufficient access to the users OneDrive for Business sites.

Stage 7 Migrating OneDrive For Business to the new Tenant

This stage is rather like the previous one. However you will need to ensure that all the users OneDrive sites have been provisioned, unfortunately just by allocating a license to the user does not automatically provision, so there is a script that needs to be run in order to force the provisioning to take place. This also takes some time to do depending on how many users there are.

1, Provision OneDrive For Business Sites in new Tenant

https://docs.microsoft.com/en-us/onedrive/pre-provision-accounts

2, Assign eDiscovery permissions to OneDrive for Business – New Tenant (destination)

https://docs.microsoft.com/en-us/office365/securitycompliance/assign-permissions-to-onedrive-for-business-sites?redirectSourcePath=%252fen-us%252farticle%252fAssign-eDiscovery-permissions-to-OneDrive-for-Business-sites-422858ff-917b-46d4-9e5b-3397f60eee4d

3, Run the Systools Migration Tool to move the data between the tenants. – Make sure your CSV files that are created with this tool match the users up correctly, as it will be very easy to mix up the user source and destination. – we don’t want users to get the wrong data in their OneDrive sites.

Download & Install SysTools OneDrive Migrator Tool.

check-for-prerequisiteNow provide the ID for the first Onedrive account. CLick on the “Login” button:

check-for-prerequisiteNow, The tool will redirect to a browser window where you have to provide the password for the same.

check-for-prerequisite


STEP 2


Now, Provide the credentials for the second account as follows:

scan


STEP 3


Click on the “Import CSV” button in order to add a csv file containing all the id that are to be added to the CSV file.

select file typeNavigate and select the location for the CSV file as follows:

select file type


STEP 4


The Ids will be displayed as follows in the following section:

file folderClick on the “Next” button.

file folder


STEP 5


Now, Provide the filters in the following section as follows:

Provide the permissions for which the files are to be transferred on the respective ids:

file folderClick on the “Import CSV” button.


STEP 6


Go to the Date filterto provide the calendar interval according to which the data should be transferred.

search by


STEP 7


Click on “Advanced Settings” and check mark the check box correspoding to the text include file type as follows:

search byClick on the “Export” button.


STEP 8


The export process will start as follows:

search byThe conversion will be completed as follows:

search by


STEP 9


Click on the “Save Report” to save the export report for the process:

search byNavigate the location for the final export report file:

search byThe export report will be saved successfully.

search by


STEP 10

The export report can be viewed as follows:

search byThe final migrated can also be viewed as:

search by

Office 365 – Linking Cloud Only Accounts to Sync’d AD Accounts

Recently I have been working with a customer who wanted to move key business services over to Office 365, so Exchange Online, SharePoint and OneDrive. The company had already created a tenant and was using it for Power BI. They had a number of user accounts created (Cloud only) that matched the company email address.  – This made the migration process a little more interesting as we had to match up the Active directory user accounts with the Azure AD account that were already being used within Office 365 so the user only had one username and the password that matched that of the one they use to log onto there local domain.

In order to make this work, we have to match up the users GuiD from Active Directory to the Immutable ID of that for the users created on Office 365 / Azure AD. – The following steps will explain how this is done.

Install Microsoft Online Services Signin Assistant and Azure AD powershell module, I recommend that you do this on a domain controller for making things simple (Link https://msdn.microsoft.com/en-us/library/azure/jj151815.aspx#bkmk_installmodule )

On the Domain Controller open a powershell window and run the command

Import-Module ActiveDirectory

Then run the command

Get-ADUser -Identity "Enter Local AD logon ID in these quotes"

Once you run the above command you should be able to see an output like this:-​​

Now copy the objectGUID from the output and open the website http://guid-convert.appspot.com/ and paste the same on the textbox as shown in the image and click on convert, you shoud be getting the B64 value and copy the same. Make sure that there are no spaces when you paste the value in the text box. (Although, there are other ways to get the Base64 value from a GUID I recommend this approach as it is simple, you can get the same results from LDIFDE and Powershell)


Now run the command

 Import-Module MSOnline

Then run the command

Connect-MSOLService

you will see a prompt to enter credentials, enter the office 365 global admin credentials here.

Now before we proceed further make sure you get rid of the duplicate account from Office 365/Azure AD. (The one that has been Syncronised from AD) Make sure you remove it from the Deleted Users as well.


To remove the user from the deleted users container run the command:


 Remove-MsolUser -UserPrincipalName malcolm.plested@mapleit.onmicrsosoft.com -RemoveFromRecycleBin -Force


This command would permanently remove the user, so make sure you remove the right account.


Once you remove the account run the command:

 Set-MsolUser -UserPrincipalName malcolm.plested@mapleit.net -ImmutableId QX00ApTUDEiiEm5kX0WP2w==

Here you need to enter the UPN /Signin address of office 365/azure AD against which you wish to perform a hard match and after the -immutableID flag enter the B64 value that you copied from http://guid-convert.appspot.com/

Once this is done run a delta sync and you will see the once Cloud Only account will now be Synced with that of the user in AD.

Enabling Legacy On Premise Public Folders in Office 365

I have recently worked on numerous Office 365 migrations that require users that have been migrated to Office 365 to have access to legacy Exchange 2010 Public folders. By default this will not work so will require a few extra steps in order to make the magic happen. Hopefully the below will be simple enough to follow in order to enable Legacy public folders…

These instructions assume that you have used the Hybrid Configuration Wizard to configure and synchronise your on-premises and Exchange Online environments and that the DNS records used for most users’ Autodiscover references an on-premises end-point. For more information, see Hybrid Configuration wizard.

If your public folders are on Exchange 2010 servers, then you need to install Client Access services on all mailbox servers that have a public folder database. This allows the Exchange RpcClientAccess service to be running, which allows for all clients to access public folders. For more information, see Install Exchange Server 2010. – The Servers will require a reboot in order for this role to become available – so remember to plan the outage before starting this process.

Create an empty mailbox database on each public folder server.

For Exchange 2010, run the following command. This command excludes the mailbox database from the mailbox provisioning load balancer. This prevents new mailboxes from automatically being added to this database.

New-MailboxDatabase -Server <PFServerName_with_CASRole> -Name 
<NewMDBforPFs> -IsExcludedFromProvisioning $true

Create a proxy mailbox within the new mailbox database and hide the mailbox from the address book. The SMTP of this mailbox will be returned by AutoDiscover as the DefaultPublicFolderMailbox SMTP, so that by resolving this SMTP the client can reach the legacy exchange server for public folder access.

New-Mailbox -Name <PFMailbox1> -Database <NewMDBforPFs>
Set-Mailbox -Identity <PFMailbox1> -HiddenFromAddressListsEnabled $true

For Exchange 2010, enable Autodiscover to return the proxy public folder mailboxes.

For Exchange 2010, enable Autodiscover to return the proxy public folder mailboxes.

Set-MailboxDatabase <NewMDBforPFs> -RPCClientAccessServer 
<PFServerName_with_CASRole>

Repeat the preceding steps for every public folder server in your organisation.

Download the following files from Mail-enabled Public Folders – directory sync script:

  • Sync-MailPublicFolders.ps1
  • SyncMailPublicFolders.strings.psd1

Save the files to the local computer on which you’ll be running PowerShell. For example, C:\PFScripts.

On the legacy Exchange server with the public folders, run the following command to synchronise mail-enabled public folders from your local on-premises Active Directory to Office 365.

Sync-MailPublicFolders.ps1 -Credential (Get-Credential) 
-CsvSummaryFile:sync_summary.csv

Where Credential is your Office 365 user name and password, and CsvSummaryFile is the path to where you would like to log synchronisation operations and errors, in .csv format.

The final step in this procedure is to configure the Exchange Online organisation and to allow access to the legacy on-premises public folders. Make remote public folders discoverable to enable the Exchange Online organisation to access the on-premises public folders.

Set-OrganizationConfig -PublicFoldersEnabled Remote -
RemotePublicFolderMailboxes PFMailbox1,PFMailbox2,PFMailbox3

You must wait until Active Directory synchronisation has completed to see the changes. This process can take up to 3 hours to complete. If you don’t want to wait for the recurring synchronisations that occur every three hours, you can force directory synchronisation at any time. For detailed steps to force directory synchronisation, see Force directory synchronization. Office 365 randomly selects one of the public folder mailboxes that’s supplied in this command. – Make sure the PFUser that you created is also located in an OU that is synchronised to O365, if not the above command will not work.

How Do You Know If This Has Worked?

This last change can take a while to apply (Approx 1 Hour). To make sure that the change applied run the following cmdlet: Get-Mailbox <username> |fl *public*

defaultPFMBX.png

Office 365 Credential Issues

If you’ve ever connected a workstation to Office 365 and then been constantly prompted for your credentials you know how frustrating it can be.  Have you ever checked that box in Outlook to “Remember Password” and then screamed in frustration as yet another logon prompt came up?

Below is a collection of sites that can help you troubleshoot issues logging into your Office 365 account.

PowerShell Script to List Active Directory Users & Last Logon Time

Occasionally there is a need to quickly query Active Directory for all user accounts or user accounts with only certain values in particular properties. This can be done by installing and loading the Microsoft Active Directory Administration module for PowerShell. This is an add-on module, named ActiveDirectory, that provides cmdlets that let you manage your Active Directory domains.

Below is a script I recently put together to produce a CSV File detailing the following:

Displayname – @{e={$_.properties.cn};n=’Display Name’},`

Username – @{e={$_.properties.samaccountname};n=’Username’}

LastLogonTime – @{e={[datetime]::FromFileTimeUtc([int64]$_.properties.lastlogontimestamp[0])};n=’Last Logon’},`

Account Disabled or Not – @{e={[string]$adspath=$_.properties.adspath;$account=[ADSI]$adspath;$account.psbase.invokeget(‘AccountDisabled’)};n=’Account Is Disabled’}

The Complete Script is below – Just copy and past the following into notepad, and save the file as filename.ps1

$NumDays = 0
$LogDir = “.\User-Accounts.csv”

$currentDate = [System.DateTime]::Now
$currentDateUtc = $currentDate.ToUniversalTime()
$lltstamplimit = $currentDateUtc.AddDays(- $NumDays)
$lltIntLimit = $lltstampLimit.ToFileTime()
$adobjroot = [adsi]”
$objstalesearcher = New-Object System.DirectoryServices.DirectorySearcher($adobjroot)
$objstalesearcher.filter = “(&(objectCategory=person)(objectClass=user)(lastLogonTimeStamp<=” + $lltIntLimit + “))”

$users = $objstalesearcher.findall() | select `
@{e={$_.properties.cn};n=’Display Name’},`
@{e={$_.properties.samaccountname};n=’Username’},`
@{e={[datetime]::FromFileTimeUtc([int64]$_.properties.lastlogontimestamp[0])};n=’Last Logon’},`
@{e={[string]$adspath=$_.properties.adspath;$account=[ADSI]$adspath;$account.psbase.invokeget(‘AccountDisabled’)};n=’Account Is Disabled’}

$users | Export-CSV -NoType $LogDir