Microsoft has recently announced that it will be stopping older Exchange versions from sending mail through Exchange Online. This is a significant move that will impact organisations that still use older versions of Exchange.
Exchange Online provides enterprise-grade security and reliability, ensuring that users’ data is always protected.
Microsoft is stopping older Exchange versions from sending mail through Exchange Online to improve the security and reliability of the service. Older versions of Exchange may not have the latest security updates or features, making them more vulnerable to cyber threats. This puts users’ data at risk, which is why Microsoft is taking this step to protect its customers.
Microsoft will be stopping the following versions of Exchange from sending mail through Exchange Online:
Exchange 2010
Exchange 2013
Exchange 2016 without Cumulative Update 23 or later
Exchange 2019 without Cumulative Update 12 or later
Organisations that are still using older versions of Exchange will need to upgrade to a newer version or move to Exchange Online to continue using the service. This may require significant effort and resources, depending on the size of the organization and the complexity of the email system.
However, upgrading to a newer version of Exchange or moving to Exchange Online has several benefits. It provides better security and reliability, ensures that users have access to the latest features, and enables organisations to take advantage of the latest cloud-based technologies.
In addition to upgrading to the latest version of Exchange, organisations should also take other steps to improve their overall security posture. This includes implementing strong password policies, using multi-factor authentication, regularly backing up data, and training employees on how to recognise and report suspicious activity.
I have been recently doing some work for a local council where they require a migration strategy to move away from an ageing on premise Exchange 2010 and 2016 environment. The environment is currently hosted in a secure infrastructure managed by a large 3rd party who have put in place many security functions such as F5 proxies, numerous firewalls to protect the councils data. The main challenge here was to enable mail flow from the EOL services to EOP. One key factor into this solution is that Microsoft specify the following:
We must not place any servers, services, or devices that process or modify SMTP traffic (Filtering / Packet inspection) between the on-premises Exchange servers and Microsoft 365 or Office 365. Secure mail flow between the on-premises Exchange organisation and Microsoft 365 or Office 365 depends on information contained in messages sent between the organisations. Firewalls that allow SMTP traffic on TCP port 25 through without modification are supported. If a server, service, or device processes a message sent between your on-premises Exchange organisation and Microsoft 365 or Office 365, this information is removed. If this happens, the message will no longer be considered internal to the organisation and will be subject to anti-spam filtering, transport and journal rules, and other policies that may not apply to it.
With the above in mind we had to implement a solution that would not impact current mail flow and provide a solution to connect the EOP to EOL for just hybrid mail flow. To do this we implemented a Microsoft Exchange 2016 Edge Transport Server in the parimeter network and NAT the SMTP traffic through the firewall to the Exchange Mailbox Server in the internal network. The following explains the configuration to get this to work:
Exchange Edge Transport Network Diagram
Network ports required for mail flow with Edge Transport Server
Inbound mail – Edge Transport server to internal Exchange organization
25/TCP (SMTP)
Edge Transport server
Mailbox servers in the subscribed Active Directory site
Outbound mail – Internal Exchange organization to Edge Transport server
25/TCP (SMTP)
Mailbox servers in the subscribed Active Directory site
Edge Transport server
Outbound mail – Edge Transport server to internet
25/TCP (SMTP)
Edge Transport server
Internet (any)
EdgeSync synchronization
50636/TCP (secure LDAP)
Mailbox servers in the subscribed Active Directory site that participate in EdgeSync synchronization
Edge Transport servers
DNS for name resolution of the next mail hop*
53/UDP,53/TCP (DNS)
Edge Transport server
DNS server
Mail flow with Edge Transport Server
The following process describes the path messages take between an on-premises organisation and Exchange Online when the Edge Transport server is deployed.
Messages from the on-premises organisation to recipients in the Exchange Online organization are sent from the internal Exchange server:
Messages from the on-premises organisation to recipients in the Exchange Online organisation are sent from a mailbox on an internal Exchange server.
The Exchange server sends the message to an Edge Transport server running a supported version and release of Exchange.
The Edge Transport server sends the message to EOP.
EOP delivers the message to the Exchange Online organization.
Messages sent from the Exchange Online organisation to recipients in the on-premises organisation follow the reverse route.
Build Exchange Edge Transport Server
Rather than me mapping out the steps for deploying the Transport Server role, the following video goes into great detail as to how you deploy it.
Install Pre Reqs
.NET Framework 4.7.1
Visual C++ Redistributable Package for Visual Studio 2012
Install-WindowsFeature ADLDS
Add DNS Suffix to the Hostname of server
Manually add the DNS record of the non domaines joined server used for Edge
Export Exchange Certificate from Exisiting
ConfigureEdge Subscription
Like the previous video, this one goes in to great detail as to how to configure the Edge Synchronisation and tests to ensure that the syncs are working as they should.
Publish Exchange SMTP Externally
Modify External DNS record for Exchange 2016
A Record: edge.domain.name to reference new Perimeter network External IP
Sensitivity labels are used to classify email messages, documents, sites, and more. When a label is applied (automatically or by the user), the content or site is protected based on the settings you choose. For example, you can create labels that encrypt files, add content marking, and control user access to specific sites.
Once we created the label policies we started to do some testing and noticed the following bounce message when we applied labels to emails:
Remote Server returned ‘550-5.7.162 OmeEncryptionAgent; Permanent Failure 550-5.7.162 Exception encountered: RmException. 550-5.7.162 Exception message: Failed to get template. Template:96be504d-7520-4645-8f23-06d0b61f9235. FailureCode:UnknownFailure. Recoverable:False.. 550 5.7.162 Please contact your system administrator for more information.’
After some research we identified that the labels had not been published as below:
The issue is caused by because the has not been a syncronisation between the Lables and Azure RMS. The following is a guide to forcing a syncronisation using PowerShell connecting to the AIP service:
1, Run the following command to install powershell module for the AIP Service:
Install-Module AIPService
2, Run the following command to enable the AIP service module:
Import-Module AIPService
3, Run the following command to connect to the AIP Service
Connect-AIPService
We then need to list all of the labels to see what the status is as below:
Get-AipServiceTemplate | FL name*, TemplateId , Status
All of the labels highlighted above as Archived have not yet sync’d to the Azure RMS service so the next command will force the label to sync, this will need to be done on each individual label as follows:
Set-AipServiceTemplateProperty -TemplateID "TemplateID" -Status Published
So an example below
Once you have ran the command you will notice that all label status’s will change to Published – we found that once the above process hads been completed the label can be applied and emailed successfully.
Microsoft have released the new Exchange Online PowerShell module today, This module supports modern authentication and includes faster alternatives to common cmdlets.
The Exchange Online PowerShell V2 module contains a small set of new cmdlets that are optimised for bulk data retrieval scenarios. Until you create a session to connect to your Exchange Online organisation, you’ll only see these new cmdlets in the module. After you connect to your Exchange Online organisation, you’ll see all of the older remote PowerShell cmdlets.
The EXO V2 module uses Modern authentication for all cmdlets. You can’t use Basic authentication in the EXO V2 module.
The new cmdlets in the EXO V2 module are meant to replace their older, less efficient equivalents. However, the original cmdlets are still available in the EXO V2 module for backwards compatibility after you create a session to connect to your Exchange Online organisation.
The new cmdlets in the EXO V2 module are listed in the following table:
Windows PowerShell needs to be configured to run scripts, and by default, it isn’t. To require all PowerShell scripts that you download from the internet are signed by a trusted publisher, run the following command in an elevated Windows PowerShell window: Set-ExecutionPolicy RemoteSigned Notes:
You need to configure this setting only once on your computer. Read more about execution policies here.
If you don’t do this step, you’ll receive the following error when you try to connect:Files cannot be loaded because running scripts is disabled on this system. Provide a valid certificate with which to sign the files.
Close and re-open the elevated Windows PowerShell window to get the changes from the previous steps.
Run the following command from an elevated Windows PowerShell window: Install-Module -Name ExchangeOnlineManagement Enter Y to accept the license agreement.
Update the EXO V2 module
If the EXO V2 module is already installed on your computer, you can run the following commands to see the version that’s currently installed and update it to the latest version.
To see the version of the EXO V2 module that’s currently installed, run the following commands: Import-Module ExchangeOnlineManagement; Get-Module ExchangeOnlineManagement
Run the following command to update the EXO V2 module to latest version that’s available in the PowerShell Gallery: Update-Module -Name ExchangeOnlineManagement Enter Y to accept the license agreement.Note: If you receive the following error related to the PowerShellGet module, see Step 1 in the previous Install the EXO V2 module section to update the PowerShellGet module to the latest version.The specified module ‘ExchangeOnlineManagement’ with PowerShellGetFormatVersion ‘<version>’ is not supported by the current version of PowerShellGet. Get the latest version of the PowerShellGet module to install this module, ‘ExchangeOnlineManagement’.If you need to update the PowerShellGet module, be sure to close and re-open the Windows PowerShell window before you attempt to update the ExchangeOnlineManagement module.
To confirm that the update was successful, run the following commands:Import-Module ExchangeOnlineManagement; Get-Module ExchangeOnlineManagement
You can download the PowerShell command-lets today from:
I thought I would write a post about something different. I am working on a project to move users Documents, Desktop and Pictures to OneDrive for business but this is simple you may say, you just configure a GPO to redirect these known folders. What about when you cannot get to the office? At this current time everyone is on lockdown and we are being told to work from home or you may have users that never need to go to the office and are using their own device. Either way we can configure user’s devices to sync data to OneDrive without GPOs. See how to do it below.
We use a PowerShell script and execute it on the remote devices. This can be done either manually as an administrator or using an RMM tool. In this case we used Datto.
First of all we need to get the Microsoft 365 Tenant ID – here is some PowerShell you can use to gather this information: – you will need to know the Tenant Global Admin credentials for this to work:
Install-Module AzureAD -Scope CurrentUser -Force
Import-Module AzureAD -Force
$login = Connect-AzureAD
$tentantid =($login.TenantId.Guid)
Disconnect-AzureAD
$tentantid

Copy and Paste the Tenant ID into the script below:
Below is a table detailing what the Item Properties actually do:
Item Property
Details
KFMSilentOptin
This setting redirects users’ Documents, Pictures, and Desktop folders to OneDrive without any user interaction. This setting is available in the OneDrive sync app build 18.111.0603.0004 or later. Before sync app build 18.171.0823.0001, this setting redirected only empty known folders to OneDrive. Now, it redirects known folders that contain content and moves the content to OneDrive.
KFMSilentOptinWithNotification
This setting displays a notification to users after their folders have been redirected.
FilesOnDemandEnabled
This setting lets you control whether OneDrive Files On-Demand is enabled for your organization. Files On-Demand helps you save storage space on your users’ computers and minimize the network impact of sync. The feature is available to users running Windows 10 Fall Creators update (version 1709 or later).
File contents don’t download until a file is opened.
You will notice that on of the lines in the script is # out You could use this line instead of the KFMSilentOptin.
KFMOptInWithWizard
If you enable this setting and provide your organization ID, users who are syncing their OneDrive see the following window when they’re signed in. If they close the window, a reminder notification appears in the Activity Center until they move all their known folders. If a user has already redirected their known folders to a different OneDrive account, they are prompted to direct the folders to the account for your organization (leaving existing files behind).
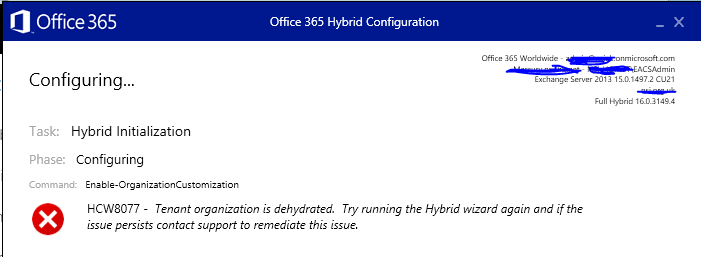
Working on a new migration project today and have come accross this error message. I have done hundreds of migrations and this is the first time I have seen this error:
The reason the above error occurred is because the tenant is currently in a compressed state. This is called dehydrated or tiny tenant mode.
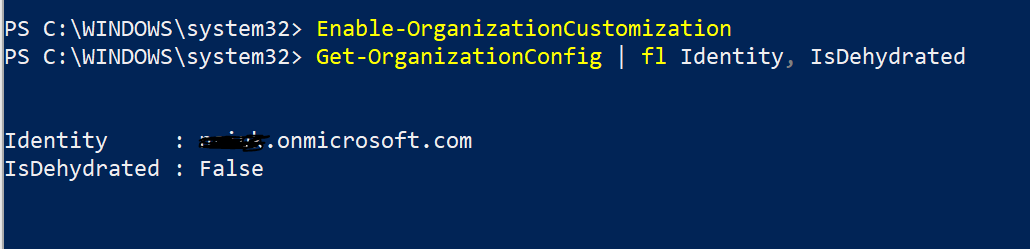
Connect to O365 in powershell and run the following command:
When you try to use Windows PowerShell (My case the HCW) to modify one of these dehydrated objects for the first time, you may encounter an error message that tells you to run the Enable-OrganizationCustomization cmdlet.
Here are some examples of when you might see this:
Creating a new role group or creating a new management role assignment.
Creating a new role assignment policy or modifying a built-in role assignment policy.
Creating a new Outlook Web App mailbox policy or modifying a built-in Outlook Web App mailbox policy.
Creating a new sharing policy or modifying a built-in sharing policy.
Creating a new retention policy or modifying a built-in retention policy.
I have not seen the error before, as normally the Hybrid configuration Wizard inflates the tenant for you.
Once I manually updated the Tenant I re ran the HCW and this time success.
Office 365 is continually evolving, expanding and improving – meaning new capabilities and opportunities, alongside the need to support adoption and manage change on an ongoing basis. Over the years I have been asked to do lots of On Premise current state assesments to help customers plan and check to ensure that their infrastructure is running optimally and meets current, and future, requirements. Recently however I have noticed an incline in requests from customers who want the same current state assesment for Office 365.
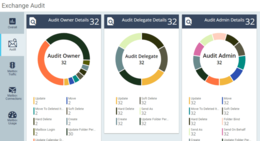
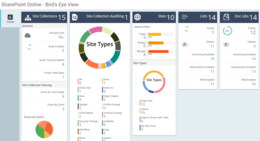
Whilst doing a bit of googling to see if there were any reporting tools that could ensure I capture key information on our customers tenant I was amazed at what I found, the following tool can be downloaded for FREE from Microsoft Technet and it ticks all the boxes:
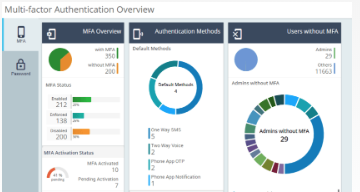
Below are some screenshot from within the reporting tool:
What Can the Tool Do?
The tool provides detail reports on the following areas of Office 365
Azure Active Directory (43 reports)
Security Reports (22 Reports)
Exchange Online (99 reports)
SharePoint Online (35 reports)
OneDrive for Business (11 reports)
Skype for Business (22 reports)
Yammer (20 reports)
Microsoft Teams (16 reports)
General Office 365 Reports (9 reports)
Reporting Capabilities Highlights
This Office 365 Reporting tool comes with advanced reporting capabilities which make tedious reporting task to an easier one.
Automatic Schedule – Schedule one or more reports to run automatically at the configured time and delivered straight to your preferred mail-ids.
Rich Filters – Apply filter on any columns to see only the required information and save the filter for future use.
Easy Customization – Allow you to easily customize the reports by rearranging, adding or removing the columns and its size.
Report Export – Ability to export the reports to CSV, PDF, HTML, XLS or XLSX.
For me this tool will help me put together usefull documentation that we can present to customers and hopefully help plan a way forward with something that customers have aready invested in, I believe this FREE tool will help customers decide on a stratagy to develop their Office 365 utilisation for the better.
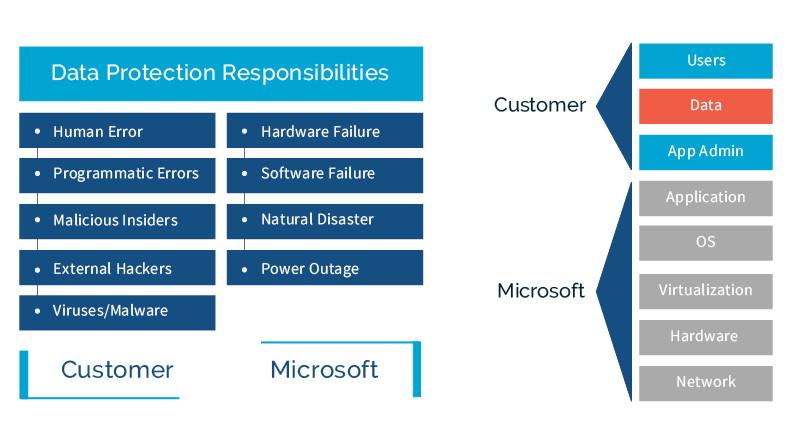
As a consultant I visit many different businesses with different solution requirements, but there is one question I get asked a lot and that is, Do I still need to ensure that my data in Office 365 is backed up?
There is a widespread misconception that data created and stored in the cloud does not need to be backed up. When data is deleted or corrupted, companies face three major problems: Lost data, lost time and lost revenue.
Data loss is often a major concern for Office 365 customers because Microsoft’s backup policies cannot guarantee a complete and speedy restore of lost data. Even when data is retrievable, the process is long and complicated, and retention policies vary for each application included in the cloud platform.
Below is an image that should hopefully help you identify who is responsible for the different aspects of Office 365
Reasons to use a third party backup provider
Ransomware attacks
Companies need to consider a multi-layered approach when it comes to security against cyber-attacks. Office 365 data is not invulnerable—without sufficient backup, companies stand to risk losing all of their files. -The WannaCry Virus is a prime example of this, we had numerous customers who’s data got encrypted and then synchronised to OneDrive, the only way around this was using 3rd party tools we already had in place protecting the businesses data. – if we did not then the data that was encrypted would have been lost.
Additional costs & data loss due to inactive licenses
As one would expect, an active Office 365 license is required to access O365 data. Unfortunately inactive or deprovisioned user data is permanently deleted, and retaining licenses of departed employees can be expensive.
Data loss due to Permanent deletion
When a SharePoint Online administrator deletes a site collection, all data will be placed in the Recycle Bin where it is deleted after 90 days. After it is automatically deleted, there is no rollback option.
Data loss when Restoring files
When restoring older files from a SharePoint backup, the restore is targeted at the same URL. This means a restore overwrites whatever data currently exists in the site collection – not the individual file or folder.
Business downtime
Contacting Microsoft Support for assistance with possible data loss after identifying the proper document version can be very time consuming.
Depending on the size of your business there are a number of Cloud backup solutions that are available to you, ones that I have used previously are:
I have recently been working on a project to move nearly 2000 users from one Office 365 tenant to another. You may say simple, there are plenty of third party tools out there that will do that for you, but what about if the customer has not budgeted for the extra cost for these tools…. What do you do?
Now in this solution we had to purchase a very cost effective tool and a SSL certificate for the Exchange Server. The costs for these were no where near the costs of all of the well known tools from BitTitan and Cloud Migrator. we were quoted $6 per user by BitTitan as it was education or for normal businesses we were quote $14 per user. So as you would expect approx 2000 licenses at $6 each works out very expensive for an unexpected cost.
The tool we used was called Systools OneDrive Migrator and as you can see the tool cost starts from $99. We ended up paying $1 per user for this product. So a massive saving on the total cost of the tool from other competitors.
Before you deploy the On Premise Exchange Server you need to make sure your AD infrastructure is in good shape and able to support the deployment of Exchange 2016, so you need to ensure that the Forest and Domain Functional Levels are at least Windows Server 2008 R2
Before you begin to install Exchange Server 2016 you will need to install the Windows Server Roles and Features… Below is the PowerShell to ensure that all Windows Features are deployed:
A successful Exchange Installation will look like this:
Stage 2 – AAD Connect
A Guide for deploying AAD Connect can be found here
Key things to take into consideration are to ensure the following:
1, The AD Account UPNs match that of the email address of the user
2, When you deploy AAD Connect the following options must be chosen in order for the Exchange Hybrid to work correctly:
Stage 3 – Update all the users in Active Directory to have some Exchange attributes
The first thing you need to do is collect information about the online mailbox that you are looking to move. The information you need is the Mailbox Alias The User Principal Name and the Mailbox Guid. To get this information and output it to a CSV file run the following script in your Exchange Online Shell.
Once you have exported the above information you will need to move over to you On Premise Exchange Server and the Exchange Management Shell and run the following command that update all of the Active Directory objects with the required Exchange Attributes:
When you go into the Exchange Management Centre and look at the mailboxes you will be able to see all of your Exchange Online Mailboxes listed in your On Prem Exchange Server.
Stage 4 – Migrate mailboxes to Exchange 2016
Prepare the Hybrid Configuration
Details for configuring and Exchange Hybrid based on your on prem Exchange Server can be found here:
Stage 5 – Migrate mailboxes to the other Office 365 Tenant
Re point the Hybrid connection to the new Office 365 Tenant
All the hard work would have been done in the previous section about creating the hybrid. – all you need to do here is re run the hybrid configuration wizard and point it at the new Office 365 tenant.
Migrate mailboxes to Office 365
Steps to move mailboxes back to Office 365 can be found here
Stage 6 – Preparing OneDrive For Business for Migration
In order for us to be able to migrate data from OneDrive for business we will need to configure user interpretation on all of the users OneDrive sites. To do this the following steps need to be followed:
Assign eDiscovery permissions to OneDrive for Business Sites – Follow this guide from Microsoft:
Once this has been done, the user that will be used to the data migration will have sufficient access to the users OneDrive for Business sites.
Stage 7 Migrating OneDrive For Business to the new Tenant
This stage is rather like the previous one. However you will need to ensure that all the users OneDrive sites have been provisioned, unfortunately just by allocating a license to the user does not automatically provision, so there is a script that needs to be run in order to force the provisioning to take place. This also takes some time to do depending on how many users there are.
1, Provision OneDrive For Business Sites in new Tenant
3, Run the Systools Migration Tool to move the data between the tenants. – Make sure your CSV files that are created with this tool match the users up correctly, as it will be very easy to mix up the user source and destination. – we don’t want users to get the wrong data in their OneDrive sites.
I am working on a large data migration project at the moment working with SharePoint Online and just had to share this issue.. it kinda got me stumped for a while…
Using SharePoint Online Management Shell I got the following error:
Now the error sent me off looking at my O365 permissions, I am a global admin for the tenant. I am basically trying to configure user interpretation so I can move users OneDrive data out to another tenant, so I have also checked permissions for eDiscovery etc. But thinking about it all I am trying to do at this stage is connect to the SharePoint Admin site.. and it is giving me this error.. This is odd, I have done this loads of times before…
After about an hour of banging my head against a brick wall, I managed to resolve the problem. The solution was simple, I changed my DNS servers on my client machine to point to Google DNS (8.8.8.8 and 8.8.4.4) and that was it. – it turns out the error is actually my ISP trying to offer a “DNS Help” page which is omitting the error.
Here are my findings when trying to sort out this issue that may help to explain why it happened in the first place.


 Now provide the ID for the first Onedrive account. CLick on the “Login” button:
 Now, The tool will redirect to a browser window where you have to provide the password for the same.

 Navigate and select the location for the CSV file as follows:
 Click on the “Next” button.
 Click on the “Import CSV” button.
 Click on the “Export” button.
 The conversion will be completed as follows:
 Navigate the location for the final export report file:
 The export report will be saved successfully.
 The final migrated can also be viewed as: