Microsoft has recently announced that it will be stopping older Exchange versions from sending mail through Exchange Online. This is a significant move that will impact organisations that still use older versions of Exchange.
Exchange Online provides enterprise-grade security and reliability, ensuring that users’ data is always protected.
Microsoft is stopping older Exchange versions from sending mail through Exchange Online to improve the security and reliability of the service. Older versions of Exchange may not have the latest security updates or features, making them more vulnerable to cyber threats. This puts users’ data at risk, which is why Microsoft is taking this step to protect its customers.
Microsoft will be stopping the following versions of Exchange from sending mail through Exchange Online:
Exchange 2010
Exchange 2013
Exchange 2016 without Cumulative Update 23 or later
Exchange 2019 without Cumulative Update 12 or later
Organisations that are still using older versions of Exchange will need to upgrade to a newer version or move to Exchange Online to continue using the service. This may require significant effort and resources, depending on the size of the organization and the complexity of the email system.
However, upgrading to a newer version of Exchange or moving to Exchange Online has several benefits. It provides better security and reliability, ensures that users have access to the latest features, and enables organisations to take advantage of the latest cloud-based technologies.
In addition to upgrading to the latest version of Exchange, organisations should also take other steps to improve their overall security posture. This includes implementing strong password policies, using multi-factor authentication, regularly backing up data, and training employees on how to recognise and report suspicious activity.
I have been recently doing some work for a local council where they require a migration strategy to move away from an ageing on premise Exchange 2010 and 2016 environment. The environment is currently hosted in a secure infrastructure managed by a large 3rd party who have put in place many security functions such as F5 proxies, numerous firewalls to protect the councils data. The main challenge here was to enable mail flow from the EOL services to EOP. One key factor into this solution is that Microsoft specify the following:
We must not place any servers, services, or devices that process or modify SMTP traffic (Filtering / Packet inspection) between the on-premises Exchange servers and Microsoft 365 or Office 365. Secure mail flow between the on-premises Exchange organisation and Microsoft 365 or Office 365 depends on information contained in messages sent between the organisations. Firewalls that allow SMTP traffic on TCP port 25 through without modification are supported. If a server, service, or device processes a message sent between your on-premises Exchange organisation and Microsoft 365 or Office 365, this information is removed. If this happens, the message will no longer be considered internal to the organisation and will be subject to anti-spam filtering, transport and journal rules, and other policies that may not apply to it.
With the above in mind we had to implement a solution that would not impact current mail flow and provide a solution to connect the EOP to EOL for just hybrid mail flow. To do this we implemented a Microsoft Exchange 2016 Edge Transport Server in the parimeter network and NAT the SMTP traffic through the firewall to the Exchange Mailbox Server in the internal network. The following explains the configuration to get this to work:
Exchange Edge Transport Network Diagram
Network ports required for mail flow with Edge Transport Server
Inbound mail – Edge Transport server to internal Exchange organization
25/TCP (SMTP)
Edge Transport server
Mailbox servers in the subscribed Active Directory site
Outbound mail – Internal Exchange organization to Edge Transport server
25/TCP (SMTP)
Mailbox servers in the subscribed Active Directory site
Edge Transport server
Outbound mail – Edge Transport server to internet
25/TCP (SMTP)
Edge Transport server
Internet (any)
EdgeSync synchronization
50636/TCP (secure LDAP)
Mailbox servers in the subscribed Active Directory site that participate in EdgeSync synchronization
Edge Transport servers
DNS for name resolution of the next mail hop*
53/UDP,53/TCP (DNS)
Edge Transport server
DNS server
Mail flow with Edge Transport Server
The following process describes the path messages take between an on-premises organisation and Exchange Online when the Edge Transport server is deployed.
Messages from the on-premises organisation to recipients in the Exchange Online organization are sent from the internal Exchange server:
Messages from the on-premises organisation to recipients in the Exchange Online organisation are sent from a mailbox on an internal Exchange server.
The Exchange server sends the message to an Edge Transport server running a supported version and release of Exchange.
The Edge Transport server sends the message to EOP.
EOP delivers the message to the Exchange Online organization.
Messages sent from the Exchange Online organisation to recipients in the on-premises organisation follow the reverse route.
Build Exchange Edge Transport Server
Rather than me mapping out the steps for deploying the Transport Server role, the following video goes into great detail as to how you deploy it.
Install Pre Reqs
.NET Framework 4.7.1
Visual C++ Redistributable Package for Visual Studio 2012
Install-WindowsFeature ADLDS
Add DNS Suffix to the Hostname of server
Manually add the DNS record of the non domaines joined server used for Edge
Export Exchange Certificate from Exisiting
ConfigureEdge Subscription
Like the previous video, this one goes in to great detail as to how to configure the Edge Synchronisation and tests to ensure that the syncs are working as they should.
Publish Exchange SMTP Externally
Modify External DNS record for Exchange 2016
A Record: edge.domain.name to reference new Perimeter network External IP
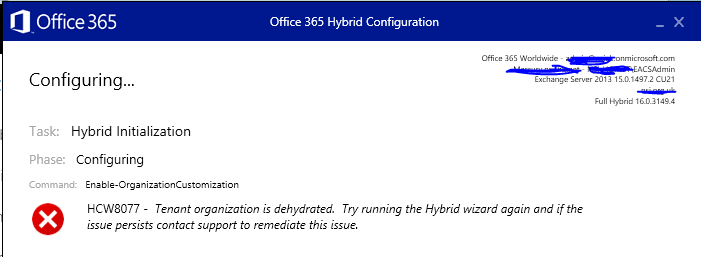
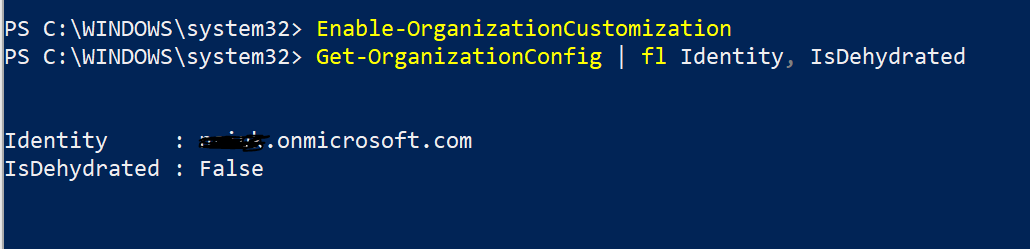
Working on a new migration project today and have come accross this error message. I have done hundreds of migrations and this is the first time I have seen this error:
The reason the above error occurred is because the tenant is currently in a compressed state. This is called dehydrated or tiny tenant mode.
Connect to O365 in powershell and run the following command:
When you try to use Windows PowerShell (My case the HCW) to modify one of these dehydrated objects for the first time, you may encounter an error message that tells you to run the Enable-OrganizationCustomization cmdlet.
Here are some examples of when you might see this:
Creating a new role group or creating a new management role assignment.
Creating a new role assignment policy or modifying a built-in role assignment policy.
Creating a new Outlook Web App mailbox policy or modifying a built-in Outlook Web App mailbox policy.
Creating a new sharing policy or modifying a built-in sharing policy.
Creating a new retention policy or modifying a built-in retention policy.
I have not seen the error before, as normally the Hybrid configuration Wizard inflates the tenant for you.
Once I manually updated the Tenant I re ran the HCW and this time success.
Office 365 is continually evolving, expanding and improving – meaning new capabilities and opportunities, alongside the need to support adoption and manage change on an ongoing basis. Over the years I have been asked to do lots of On Premise current state assesments to help customers plan and check to ensure that their infrastructure is running optimally and meets current, and future, requirements. Recently however I have noticed an incline in requests from customers who want the same current state assesment for Office 365.
Whilst doing a bit of googling to see if there were any reporting tools that could ensure I capture key information on our customers tenant I was amazed at what I found, the following tool can be downloaded for FREE from Microsoft Technet and it ticks all the boxes:
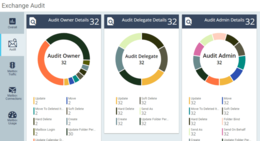
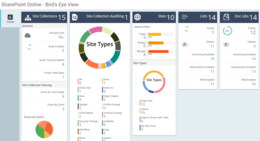
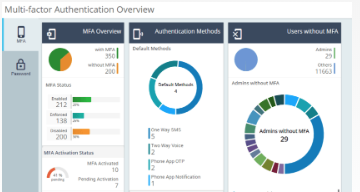
Below are some screenshot from within the reporting tool:
What Can the Tool Do?
The tool provides detail reports on the following areas of Office 365
Azure Active Directory (43 reports)
Security Reports (22 Reports)
Exchange Online (99 reports)
SharePoint Online (35 reports)
OneDrive for Business (11 reports)
Skype for Business (22 reports)
Yammer (20 reports)
Microsoft Teams (16 reports)
General Office 365 Reports (9 reports)
Reporting Capabilities Highlights
This Office 365 Reporting tool comes with advanced reporting capabilities which make tedious reporting task to an easier one.
Automatic Schedule – Schedule one or more reports to run automatically at the configured time and delivered straight to your preferred mail-ids.
Rich Filters – Apply filter on any columns to see only the required information and save the filter for future use.
Easy Customization – Allow you to easily customize the reports by rearranging, adding or removing the columns and its size.
Report Export – Ability to export the reports to CSV, PDF, HTML, XLS or XLSX.
For me this tool will help me put together usefull documentation that we can present to customers and hopefully help plan a way forward with something that customers have aready invested in, I believe this FREE tool will help customers decide on a stratagy to develop their Office 365 utilisation for the better.
I have recently been working on a project to move nearly 2000 users from one Office 365 tenant to another. You may say simple, there are plenty of third party tools out there that will do that for you, but what about if the customer has not budgeted for the extra cost for these tools…. What do you do?
Now in this solution we had to purchase a very cost effective tool and a SSL certificate for the Exchange Server. The costs for these were no where near the costs of all of the well known tools from BitTitan and Cloud Migrator. we were quoted $6 per user by BitTitan as it was education or for normal businesses we were quote $14 per user. So as you would expect approx 2000 licenses at $6 each works out very expensive for an unexpected cost.
The tool we used was called Systools OneDrive Migrator and as you can see the tool cost starts from $99. We ended up paying $1 per user for this product. So a massive saving on the total cost of the tool from other competitors.
Before you deploy the On Premise Exchange Server you need to make sure your AD infrastructure is in good shape and able to support the deployment of Exchange 2016, so you need to ensure that the Forest and Domain Functional Levels are at least Windows Server 2008 R2
Before you begin to install Exchange Server 2016 you will need to install the Windows Server Roles and Features… Below is the PowerShell to ensure that all Windows Features are deployed:
A successful Exchange Installation will look like this:
Stage 2 – AAD Connect
A Guide for deploying AAD Connect can be found here
Key things to take into consideration are to ensure the following:
1, The AD Account UPNs match that of the email address of the user
2, When you deploy AAD Connect the following options must be chosen in order for the Exchange Hybrid to work correctly:
Stage 3 – Update all the users in Active Directory to have some Exchange attributes
The first thing you need to do is collect information about the online mailbox that you are looking to move. The information you need is the Mailbox Alias The User Principal Name and the Mailbox Guid. To get this information and output it to a CSV file run the following script in your Exchange Online Shell.
Once you have exported the above information you will need to move over to you On Premise Exchange Server and the Exchange Management Shell and run the following command that update all of the Active Directory objects with the required Exchange Attributes:
When you go into the Exchange Management Centre and look at the mailboxes you will be able to see all of your Exchange Online Mailboxes listed in your On Prem Exchange Server.
Stage 4 – Migrate mailboxes to Exchange 2016
Prepare the Hybrid Configuration
Details for configuring and Exchange Hybrid based on your on prem Exchange Server can be found here:
Stage 5 – Migrate mailboxes to the other Office 365 Tenant
Re point the Hybrid connection to the new Office 365 Tenant
All the hard work would have been done in the previous section about creating the hybrid. – all you need to do here is re run the hybrid configuration wizard and point it at the new Office 365 tenant.
Migrate mailboxes to Office 365
Steps to move mailboxes back to Office 365 can be found here
Stage 6 – Preparing OneDrive For Business for Migration
In order for us to be able to migrate data from OneDrive for business we will need to configure user interpretation on all of the users OneDrive sites. To do this the following steps need to be followed:
Assign eDiscovery permissions to OneDrive for Business Sites – Follow this guide from Microsoft:
Once this has been done, the user that will be used to the data migration will have sufficient access to the users OneDrive for Business sites.
Stage 7 Migrating OneDrive For Business to the new Tenant
This stage is rather like the previous one. However you will need to ensure that all the users OneDrive sites have been provisioned, unfortunately just by allocating a license to the user does not automatically provision, so there is a script that needs to be run in order to force the provisioning to take place. This also takes some time to do depending on how many users there are.
1, Provision OneDrive For Business Sites in new Tenant
3, Run the Systools Migration Tool to move the data between the tenants. – Make sure your CSV files that are created with this tool match the users up correctly, as it will be very easy to mix up the user source and destination. – we don’t want users to get the wrong data in their OneDrive sites.
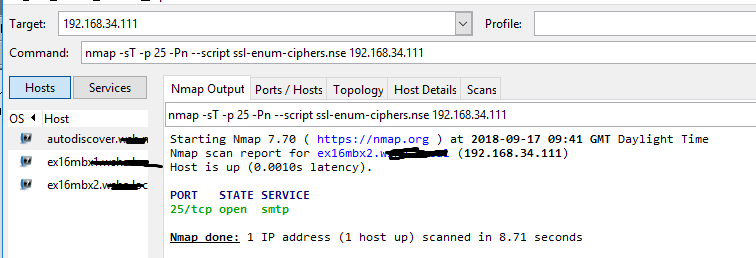
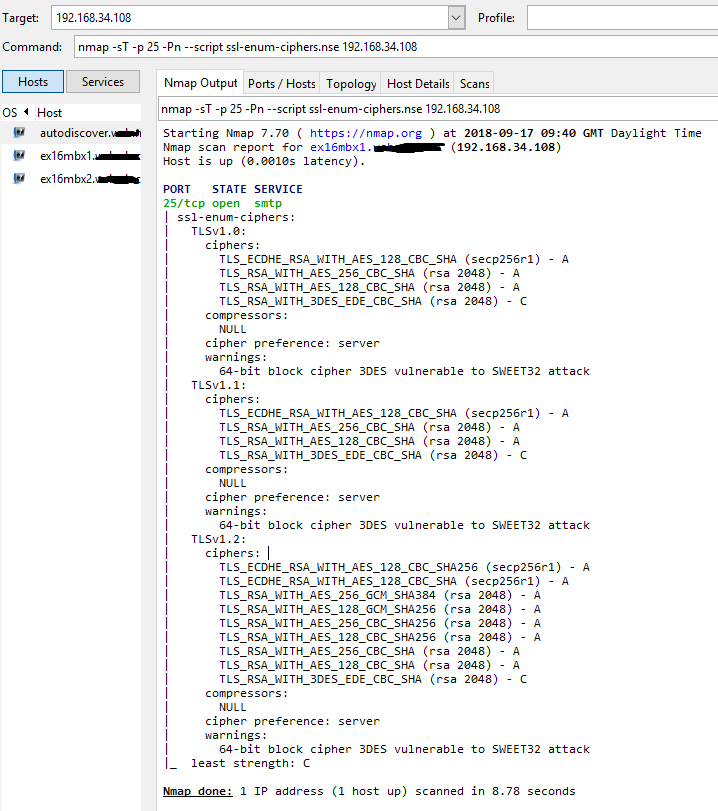
I have recently been working with a customer to upgrade to Exchange Server 2016, one of the requirements is to enable TLS 1.2. The following will guide you through the preparation, implementation and then testing.
Install Cumulative Update (CU) 8 in production for TLS 1.2 support and be ready to upgrade to CU9 after its release if you need to disable TLS 1.0 and TLS 1.1. –CU 10 is now available.
Install the newest version of .NET and associated patches supported by your CU (currently 4.7.2).
Exchange Server 2013
Install CU19 in production for TLS 1.2 support and be ready to upgrade to CU20 after its release if you need to disable TLS 1.0 and TLS 1.1.
Install the newest version of .NET and associated patches supported by your CU (currently 4.7.2).
Windows Server 2016
TLS 1.2 is the default security protocol for Schannel and consumable by WinHTTP.
Ensure you have installed the most recent Monthly Quality Update along with any other offered Windows updates.
Windows Server 2012 R2
TLS 1.2 is the default security protocol for Schannel and consumable by WinHTTP
Ensure your server is current on Windows Updates.
This should include security update KB3161949 for the current version of WinHTTP.
If you rely on SHA512 certificates; please see KB2973337.
Windows Server 2012
TLS 1.2 is the default security protocol for Schannel.
Ensure your server is current on Windows Updates.
This should include security update KB3161949 for the current version of WinHTTP.
If you rely on SHA512 certificates; please see KB2973337.
Implementation
Enable TLS 1.2 for Schannel
To enable TLS 1.2 for both server (inbound) and client (outbound) connections on an Exchange Server please perform the following.
From Notepad.exe, create a text file named TLS12-Enable.reg.
Copy and paste the following text into the file.
Windows Registry Editor Version 5.00
[HKEY_LOCAL_MACHINE\SYSTEM\CurrentControlSet\Control\SecurityProviders\SCHANNEL\
Protocols\TLS 1.2]
[HKEY_LOCAL_MACHINE\SYSTEM\CurrentControlSet\Control\SecurityProviders\SCHANNEL\
Protocols\TLS 1.2\Client]
"DisabledByDefault"=dword:00000000
"Enabled"=dword:00000001
[HKEY_LOCAL_MACHINE\SYSTEM\CurrentControlSet\Control\SecurityProviders\SCHANNEL\
Protocols\TLS 1.2\Server]
"DisabledByDefault"=dword:00000000
"Enabled"=dword:00000001
Save TLS12-Enable.reg.
Double-click the TLS12-Enable.reg file.
Click Yes to update your Windows Registry with these changes.
Restart the machine for the changes to take effect.
Enable TLS 1.2 for .NET 4.x
This step is only required for Exchange Server 2013 or later installations where .NET 4.x is relied upon.
The SystemDefaultTlsVersions registry value defines which security protocol version defaults will be used by .NET Framework 4.x. If the value is set to 1, then .NET Framework 4.x will inherit its defaults from the Windows Schannel DisabledByDefault registry values. If the value is undefined, it will behave as if the value is set to 0. By configuring .NET Framework 4.x to inherit its values from Schannel we gain the ability to use the latest versions of TLS supported by the OS, including TLS 1.2.
From Notepad.exe, create a text file named NET4X-UseSchannelDefaults.reg.
Copy, and then paste the following text.
Windows Registry Editor Version 5.00
[HKEY_LOCAL_MACHINE\SOFTWARE\Microsoft\.NETFramework\v4.0.30319]
"SystemDefaultTlsVersions"=dword:00000001
[HKEY_LOCAL_MACHINE\SOFTWARE\Wow6432Node\Microsoft\.NETFramework\v4.0.30319]
"SystemDefaultTlsVersions"=dword:00000001
Save the NET4X-UseSchannelDefaults.reg file.
Double-click the NET4X-UseSchannelDefaults.reg file.
Click Yes to update your Windows Registry with these changes.
Restart your computer for the change to take effect.
Note: When configuring a system for TLS 1.2, you can make the Schannel and .NET registry keys at the same time and reboot the server once.
Testing
Testing before TLS has been enabled (the default state of an Exchange 2016 Deployment) using ZenMap
Testing after TLS has been enabled (after following the above procedures) using ZenMap
Message Headers (Exchange Server 2016 Only)
Message header data in Exchange Server 2016 provides the protocol negotiated and used when the sending and receiving host exchanged a piece of mail. While this is a more manual method of checking how mail arrived it can be used for testing between specific systems in a pinch.
SMTP Logs in Exchange 2016 will contain the encryption protocol and other encryption related information used during the exchange of email between two systems.
When the server is the SMTP receiving system, the following strings exist in the log depending on the version of TLS used.
TLS protocol SP_PROT_TLS1_0_SERVER
TLS protocol SP_PROT_TLS1_1_SERVER
TLS protocol SP_PROT_TLS1_2_SERVER
When the server is the SMTP sending system, the following strings exist in the log depending on the version of TLS used.
Some companies I deployed Exchange or Office 365 would like to be able to view readable information in everyone’s calendar by default you only get Free or Busy information. The following script changes the default calendar permissions for ALL Users folders to Reviewer – This gives you readable / not editable information.
Senior management sometimes have PA’s that will need delegate access to their calendar, this this will include view calendar items that are marked as private.
To Set the delegate to view private items in the calendar
Wow, time flies when you are having fun….I can’t believe it has been 7 months since my last post.
So since January I have been really busy with numerous projects revolving largely around Office 365 and Exchange. I have picked up some useful knowledge which I will write about here in the coming weeks.
This post is dedicated to something new to me – G-Suite to Office 365 – What a ride this has been! Let me explain how I managed to get it all to hang together and get the two services to exist together during the migration and testing phases.
EMAIL Co Existence / Routing between O365 and G-Suite
This was the tricky bit, how could we get users to co-exist in different services whilst we undertake testing and migrations? There is no connector or hybrid solution like there is with Exchange. We did not want to cut over all the users at the same time – this had to be a phased migration over to Office 365. We are also using MimeCast for SPAM and Relay protection so we need Google & Office 365 to send outbound via Mimecast without any mails getting blocked. Here is how we did it:
Office 365
Office 365 needs to be forwarding mail onto a domain that G-Suite knows about and the users mailboxes need to have an alias address for office 365 to forward onto.
The steps are as follows:
Add Domain Domain A with MX Record
Add secondary email address for each user. This needs to be set to: user@domainA.com
For users that are not yet in Office 365 we need to configure the Accepted Domain as an Internal Relay in Mail Flow in Exchange Online Admin Centre
Then we create a connector back to G-Suite for any address that does not live in O365 yet. Doing this tells Exchange Online to send the email to the recipient over in G-Suite.
We then stumbled across another minor problem. In order for the Email Data to be migrated into the new Office 365 users mailbox, we need to activate the license. In doing this creates a Office 365 mailbox so then Office 365 thinks the user is now happily working from Office 365. “WRONG”!!! The user still lives in G-Suite until the migration is completed. So in order for the users in Office 365 to send to a user in G-Suite who’s mailbox is provisioned in O365 we have need to create another forwarder back to G-Suite until the migration is completed. How to do this in bulk is in a following section in the blog post. – Adding Contacts to Office 365.
G-Suite
G-Suite needs to have a forwarder configured that the Tenant does not have the domain registered to. If you register a domain with Google it treats all SUB domains as internal as well, so a completely new unregistered domain is required to forward any Office 365 bound mail to.
In order for Gmail to send a message to a forwarding address, the address needs to be verified. So here is a way to forward to an address that is not verified (added to the G-Suite Tenant):
You will need to apply mappings (aliases) to recipient addresses on messages received by your domain. You can map multiple individual recipient addresses (a maximum of 2,000 entries) to other addresses. An individual address can map to a maximum of twelve addresses.
This is a basic routing concept, sometimes called a virtual user table, that’s frequently used in mail routing situations to redirect mail from one address to another. By using this setting you don’t need to create individual routing settings for each address mapping.
Configure the Recipient address map setting for your domain:
From the Admin console Home page, go to AppsG SuiteGmailAdvanced settings.Tip: To see Advanced settings, scroll to the bottom of the Gmail page.
At the top of the page, ensure that the top-level org is highlighted.
Scroll down to the Recipient address map section, or type Recipient address map in the search box:
If the setting’s status is Not configured yet, click Configure (the “Add setting” dialog box displays).
If the setting’s status is Locally applied or Inherited, click Edit to edit an existing setting (the “Edit setting” dialog box displays).
Enter a short description that will appear within the setting’s summary.
Under Messages to affect, select All incoming messages or Only external incoming messages.
Scroll down to Routing options, and select Also route to original destination to send a copy of the message to the new address and also deliver it to the original recipient.
Note: If you don’t select this option, the message is only sent to the new address.
For example, jensmith@solarmora.com is in the address map and the new address is jensmith@gmail.com. If the checkbox is checked, both jensmith@solarmora.com and jensmith@gmail.com will receive a copy of the message. If the checkbox is unchecked, then only jensmith@gmail.com will receive the message.
Enter address mappings in the box.
Each mapping must include two addresses on a single line, separated by a comma. Place the map-to address after the comma. In the following example, davidb@solarmora.com is the map-to address:
When you’re finished making changes, click Add setting or Save to close the dialog box. Note: Any settings you add are highlighted on the “Email settings” page.
Click Save changes at the bottom of the “Email settings” page.
When you’re finished, click Add Setting (at the bottom of the dialog box).
Click Save changes (at the bottom of the “Email settings” page) to confirm your changes.
It can take up to an hour for changes to propagate to user accounts. You can track changes in the Admin audit log.
Adding Contacts to Office 365
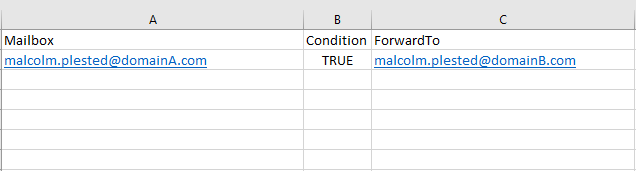
First of all you will need a CSV file like the one in the image below ensuring the column headers match:
When you have created your list of new Contacts that you need to create you can then import these into Office 365 using the following Powershell Commands:
We then had to update all the Office 365 mailboxes to use the forwarding address to send mail back to G-Suite using the following PowerShell and CSV file:
So when adding the mailboxes in Office 365 be default the users email addresses were the onmicrosoft.com domain. This was happening because there were no On Premise Exchange Server therefore no Proxy addresses recorded in Active Directory. We then had to add all of the email address alias’s to the proxy addresses using PowerShell. The next few commands are how we did this.
Export the SamAccount and Existing Email details
Import-Module ActiveDirectory
# Delete file if it exists
$FileName = "C:\temp\user.csv"
if (Test-Path $FileName)
{
  Remove-Item $FileName
}
Get-Aduser -filter * -Properties * |
Select SamAccountName,mail | export-csv $FileName
Once you have a list of users with the correct list of Alias addresses I then ran the following PoweShell to update all of the proxy addresses
Navigate to Apps | G Suite | Gmail | Advanced Settings.
Click on the Hostsbutton.
Click on the Add Route button.
Enter a Route Name (e.g. Mimecast Outbound Host).
Select Multiple Host and enter the Mimecast Outbound Hostnames for your Mimecast region. Both must be marked as primary. See the “Outbound Send Connectors section of the Mimecast Gateway page for full details.
Click on the Save button.
Click on the Add Route button.
Enter a Route Name (e.g. Internal Sending Host).
Select Multiple Host and enter the Google Apps MX Records (ASPMX.L.GOOGLE.COM. and ALT1.ASPMX.L.GOOGLE.COM).
Click on the Save button.
To configure routing rules:
Click on the General Settings tab.
Navigate to the Routing section.
Click on the Configure button.
Select the Outbound option in the “Messages to Affect” section.
Select the Change Route option in the Route section.
Select the Route Name created in step 5 of the “Preparing Your Outbound Hostname” section.
Click on the Add Setting button.
Click on the Add Another button.
Select the Internal | Sending option in the “Messages to Affect” section.
Select the Change Route option in the Route section.
Select the Route Name created in step 9 of the “Preparing Your Outbound Hostname” section.
Click on the Add Setting button.
Office 365
Log in to the Office 365 Administration Console.
Select the Admin | Exchangemenu item.
Select the Mail Flow | Connectors menu item.
Create a Connector.
Complete the New Connector – Select Your Mail Flow Scenario dialog as follows:
Field
Description
From
Select “Office 365” from the drop down list.
To
Select “Partner Organization” from the drop down list.
Select the Next button.
Complete the New Connector – New Connector dialog as follows:
Field
Description
Name
Enter a name for the connector.
Description
Enter a description for the connector.
Turn It On
Select this option to enable the connector.
Select the Next button.
Select the Only When Email Messages are Sent to These Domains option.
Select the icon to add the recipient domains that should use this connector.
Enter a value of *to route all outbound emails through us.
Select the OK button.
Select the Next button.
Select the Route Email Through These Smart Hosts option.
Select the icon to add your region’s smart hosts.
Region
Office 365 Account Hostnames
Europe (Excluding Germany)
eu-smtp-o365-outbound-1.mimecast.com
eu-smtp-o365-outbound-2.mimecast.com
Germany
de-smtp-o365-outbound-1.mimecast.com
de-smtp-o365-outbound-2.mimecast.com
America
us-smtp-o365-outbound-1.mimecast.com
us-smtp-o365-outbound-2.mimecast.com
South Africa
za-smtp-o365-outbound-1.mimecast.co.za
za-smtp-o365-outbound-2.mimecast.co.za
Australia
au-smtp-o365-outbound-1.mimecast.com
au-smtp-o365-outbound-2.mimecast.com
Offshore
je-smtp-o365-outbound-1.mimecast-offshore.com
je-smtp-o365-outbound-2.mimecast-offshore.com
Select the Save button.
Select theNext button.
Select the following options:
Always use Transport Layer Security (TLS) to Secure the Connection (recommended)
Issued by a trusted certificate authority (CA)
Select the Next button.
Select the Next button.
Add an Email Address of a recipient from a domain external to your organization.
Select the Validate button.
Select the Save button once Office 365 has successfully validated your settings.
So our experience with the Cloud Migrator APP has been interesting. Initially we started to use the Cloud Migrator Go SaaS application which was reasonably simple to configure following the guides provided by Cloud M. However we soon realised there were speed issues when moving data between G-Suite & O365. The issues are caused by the API’s between GSuite and O365 being limited. There is nothing we or Cloud M could do to improve the migration speed between the two services.
We then switched to the Cloud Migrator App which you install on your own dedicated server On Premise – in our case we used a Virtual machine in VMWare. Once configured we were able to fire up numerous Servers to run Cloud Migrator having a number of migration batches running at the same time and our Data throughput seemed to be 4x that of the cloud Migrator Go SaaS option.
All in all the customer is now running Co Existence of Office 365 and G-Suite. Mail is flowing and users are happy. We intend to complete the migration to Office 365 in the coming weeks. I decided to write this post as there does not seem to be many guides out there to help you migrate from G-Suite to Office 365. Hopefully if you read this it will help you on your projects.
One of my recent projects was to implement a new Highly Available Exchange 2016 environment for a customer who was upgrading from Exchange 2010. When Exchange 2016 was in place, we then had to create hybrid to Office 365. Below are some really useful PowerShell Commands I used during the implementation.
So after a successful deployment of Exchange 2016 the next step was to create a hybrid to Office 365 Exchange Online, Simple as Exchange 2016 was “Born in the cloud” according to Microsoft. NOT SO!!! – I downloaded the latest version of Exchange 2016 which at the time was CU7, but when configuring the hybrid it would just sit at adding Federated Domain.
A bug slipped into Exchange 2016 CU7 which prevents the HCW from completing. The HCW fails to get past the domain ownership validation:
No matter how hard you try, you can’t get past this screen.
Fortunately CU8 was release 19th December 2017 – So I spent the next day patching my newly installed Exchange environment. – then completing the Hybrid configuration.
I have recently worked on numerous Office 365 migrations that require users that have been migrated to Office 365 to have access to legacy Exchange 2010 Public folders. By default this will not work so will require a few extra steps in order to make the magic happen. Hopefully the below will be simple enough to follow in order to enable Legacy public folders…
These instructions assume that you have used the Hybrid Configuration Wizard to configure and synchronise your on-premises and Exchange Online environments and that the DNS records used for most users’ Autodiscover references an on-premises end-point. For more information, see Hybrid Configuration wizard.
If your public folders are on Exchange 2010 servers, then you need to install Client Access services on all mailbox servers that have a public folder database. This allows the Exchange RpcClientAccess service to be running, which allows for all clients to access public folders. For more information, see Install Exchange Server 2010. – The Servers will require a reboot in order for this role to become available – so remember to plan the outage before starting this process.
Create an empty mailbox database on each public folder server.
For Exchange 2010, run the following command. This command excludes the mailbox database from the mailbox provisioning load balancer. This prevents new mailboxes from automatically being added to this database.
Create a proxy mailbox within the new mailbox database and hide the mailbox from the address book. The SMTP of this mailbox will be returned by AutoDiscover as the DefaultPublicFolderMailbox SMTP, so that by resolving this SMTP the client can reach the legacy exchange server for public folder access.
Save the files to the local computer on which you’ll be running PowerShell. For example, C:\PFScripts.
On the legacy Exchange server with the public folders, run the following command to synchronise mail-enabled public folders from your local on-premises Active Directory to Office 365.
Where Credential is your Office 365 user name and password, and CsvSummaryFile is the path to where you would like to log synchronisation operations and errors, in .csv format.
The final step in this procedure is to configure the Exchange Online organisation and to allow access to the legacy on-premises public folders. Make remote public folders discoverable to enable the Exchange Online organisation to access the on-premises public folders.
You must wait until Active Directory synchronisation has completed to see the changes. This process can take up to 3 hours to complete. If you don’t want to wait for the recurring synchronisations that occur every three hours, you can force directory synchronisation at any time. For detailed steps to force directory synchronisation, see Force directory synchronization. Office 365 randomly selects one of the public folder mailboxes that’s supplied in this command. – Make sure the PFUser that you created is also located in an OU that is synchronised to O365, if not the above command will not work.
How Do You Know If This Has Worked?
This last change can take a while to apply (Approx 1 Hour). To make sure that the change applied run the following cmdlet: Get-Mailbox <username> |fl *public*


 Now provide the ID for the first Onedrive account. CLick on the “Login” button:
 Now, The tool will redirect to a browser window where you have to provide the password for the same.

 Navigate and select the location for the CSV file as follows:
 Click on the “Next” button.
 Click on the “Import CSV” button.
 Click on the “Export” button.
 The conversion will be completed as follows:
 Navigate the location for the final export report file:
 The export report will be saved successfully.
 The final migrated can also be viewed as: