I thought I would write a post about something different. I am working on a project to move users Documents, Desktop and Pictures to OneDrive for business but this is simple you may say, you just configure a GPO to redirect these known folders. What about when you cannot get to the office? At this current time everyone is on lockdown and we are being told to work from home or you may have users that never need to go to the office and are using their own device. Either way we can configure user’s devices to sync data to OneDrive without GPOs. See how to do it below.
We use a PowerShell script and execute it on the remote devices. This can be done either manually as an administrator or using an RMM tool. In this case we used Datto.
First of all we need to get the Microsoft 365 Tenant ID – here is some PowerShell you can use to gather this information: – you will need to know the Tenant Global Admin credentials for this to work:
Install-Module AzureAD -Scope CurrentUser -Force
Import-Module AzureAD -Force
$login = Connect-AzureAD
$tentantid =($login.TenantId.Guid)
Disconnect-AzureAD
$tentantid

Copy and Paste the Tenant ID into the script below:
Below is a table detailing what the Item Properties actually do:
Item Property
Details
KFMSilentOptin
This setting redirects users’ Documents, Pictures, and Desktop folders to OneDrive without any user interaction. This setting is available in the OneDrive sync app build 18.111.0603.0004 or later. Before sync app build 18.171.0823.0001, this setting redirected only empty known folders to OneDrive. Now, it redirects known folders that contain content and moves the content to OneDrive.
KFMSilentOptinWithNotification
This setting displays a notification to users after their folders have been redirected.
FilesOnDemandEnabled
This setting lets you control whether OneDrive Files On-Demand is enabled for your organization. Files On-Demand helps you save storage space on your users’ computers and minimize the network impact of sync. The feature is available to users running Windows 10 Fall Creators update (version 1709 or later).
File contents don’t download until a file is opened.
You will notice that on of the lines in the script is # out You could use this line instead of the KFMSilentOptin.
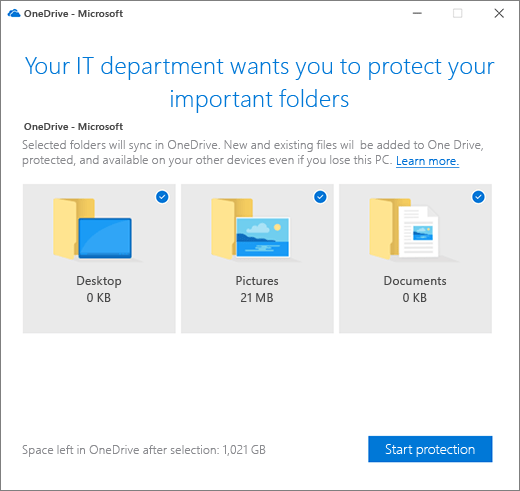
KFMOptInWithWizard
If you enable this setting and provide your organization ID, users who are syncing their OneDrive see the following window when they’re signed in. If they close the window, a reminder notification appears in the Activity Center until they move all their known folders. If a user has already redirected their known folders to a different OneDrive account, they are prompted to direct the folders to the account for your organization (leaving existing files behind).
Working on a new migration project today and have come accross this error message. I have done hundreds of migrations and this is the first time I have seen this error:
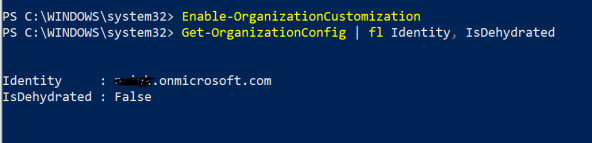
The reason the above error occurred is because the tenant is currently in a compressed state. This is called dehydrated or tiny tenant mode.
Connect to O365 in powershell and run the following command:
When you try to use Windows PowerShell (My case the HCW) to modify one of these dehydrated objects for the first time, you may encounter an error message that tells you to run the Enable-OrganizationCustomization cmdlet.
Here are some examples of when you might see this:
Creating a new role group or creating a new management role assignment.
Creating a new role assignment policy or modifying a built-in role assignment policy.
Creating a new Outlook Web App mailbox policy or modifying a built-in Outlook Web App mailbox policy.
Creating a new sharing policy or modifying a built-in sharing policy.
Creating a new retention policy or modifying a built-in retention policy.
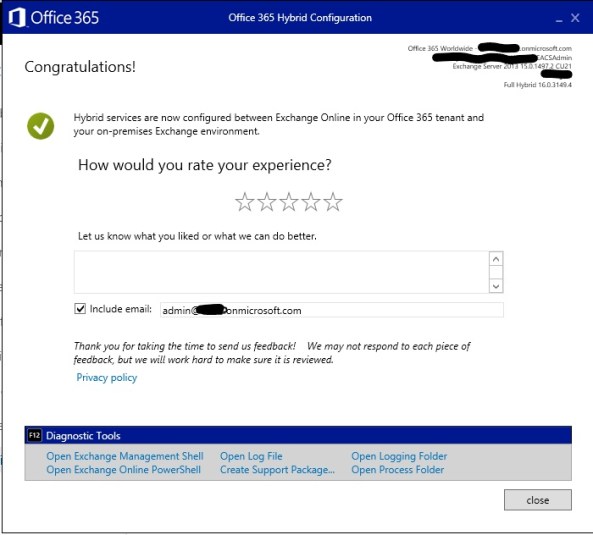
I have not seen the error before, as normally the Hybrid configuration Wizard inflates the tenant for you.
Once I manually updated the Tenant I re ran the HCW and this time success.
I have recently been working on a project to move nearly 2000 users from one Office 365 tenant to another. You may say simple, there are plenty of third party tools out there that will do that for you, but what about if the customer has not budgeted for the extra cost for these tools…. What do you do?
Now in this solution we had to purchase a very cost effective tool and a SSL certificate for the Exchange Server. The costs for these were no where near the costs of all of the well known tools from BitTitan and Cloud Migrator. we were quoted $6 per user by BitTitan as it was education or for normal businesses we were quote $14 per user. So as you would expect approx 2000 licenses at $6 each works out very expensive for an unexpected cost.
The tool we used was called Systools OneDrive Migrator and as you can see the tool cost starts from $99. We ended up paying $1 per user for this product. So a massive saving on the total cost of the tool from other competitors.
Before you deploy the On Premise Exchange Server you need to make sure your AD infrastructure is in good shape and able to support the deployment of Exchange 2016, so you need to ensure that the Forest and Domain Functional Levels are at least Windows Server 2008 R2
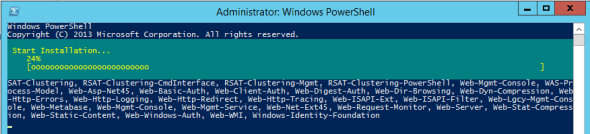
Before you begin to install Exchange Server 2016 you will need to install the Windows Server Roles and Features… Below is the PowerShell to ensure that all Windows Features are deployed:
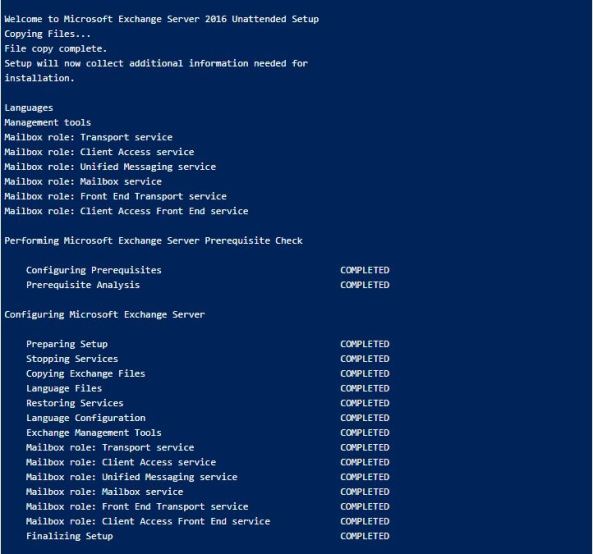
A successful Exchange Installation will look like this:
Stage 2 – AAD Connect
A Guide for deploying AAD Connect can be found here
Key things to take into consideration are to ensure the following:
1, The AD Account UPNs match that of the email address of the user
2, When you deploy AAD Connect the following options must be chosen in order for the Exchange Hybrid to work correctly:
Stage 3 – Update all the users in Active Directory to have some Exchange attributes
The first thing you need to do is collect information about the online mailbox that you are looking to move. The information you need is the Mailbox Alias The User Principal Name and the Mailbox Guid. To get this information and output it to a CSV file run the following script in your Exchange Online Shell.
Once you have exported the above information you will need to move over to you On Premise Exchange Server and the Exchange Management Shell and run the following command that update all of the Active Directory objects with the required Exchange Attributes:
When you go into the Exchange Management Centre and look at the mailboxes you will be able to see all of your Exchange Online Mailboxes listed in your On Prem Exchange Server.
Stage 4 – Migrate mailboxes to Exchange 2016
Prepare the Hybrid Configuration
Details for configuring and Exchange Hybrid based on your on prem Exchange Server can be found here:
Stage 5 – Migrate mailboxes to the other Office 365 Tenant
Re point the Hybrid connection to the new Office 365 Tenant
All the hard work would have been done in the previous section about creating the hybrid. – all you need to do here is re run the hybrid configuration wizard and point it at the new Office 365 tenant.
Migrate mailboxes to Office 365
Steps to move mailboxes back to Office 365 can be found here
Stage 6 – Preparing OneDrive For Business for Migration
In order for us to be able to migrate data from OneDrive for business we will need to configure user interpretation on all of the users OneDrive sites. To do this the following steps need to be followed:
Assign eDiscovery permissions to OneDrive for Business Sites – Follow this guide from Microsoft:
Once this has been done, the user that will be used to the data migration will have sufficient access to the users OneDrive for Business sites.
Stage 7 Migrating OneDrive For Business to the new Tenant
This stage is rather like the previous one. However you will need to ensure that all the users OneDrive sites have been provisioned, unfortunately just by allocating a license to the user does not automatically provision, so there is a script that needs to be run in order to force the provisioning to take place. This also takes some time to do depending on how many users there are.
1, Provision OneDrive For Business Sites in new Tenant
3, Run the Systools Migration Tool to move the data between the tenants. – Make sure your CSV files that are created with this tool match the users up correctly, as it will be very easy to mix up the user source and destination. – we don’t want users to get the wrong data in their OneDrive sites.


 Now provide the ID for the first Onedrive account. CLick on the “Login” button:
 Now, The tool will redirect to a browser window where you have to provide the password for the same.

 Navigate and select the location for the CSV file as follows:
 Click on the “Next” button.
 Click on the “Import CSV” button.
 Click on the “Export” button.
 The conversion will be completed as follows:
 Navigate the location for the final export report file:
 The export report will be saved successfully.
 The final migrated can also be viewed as:
